Thanks for stopping by and for any comments. I will reciprocate! Have a great week my friends! Hazel xx
Monday 30 November 2015
Getting Behind & Getting On Top
Today's post is just some Christmas cards I have made for my stash for this year. I have gotten so far behind, I really need to get a wriggle on, so here are a few I made today, as I am trying to get on top of it!
Thanks for stopping by and for any comments. I will reciprocate! Have a great week my friends! Hazel xx
Thanks for stopping by and for any comments. I will reciprocate! Have a great week my friends! Hazel xx
Saturday 28 November 2015
Freshly Made Sketches #214 - Take Two
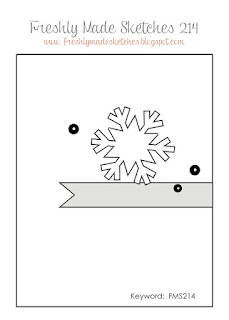
Today I have another card for Freshly Made Sketches #214 - A Sketch by Jen T and in case you didn't see the sketch yesterday, this is it.
I stayed a little truer to the sketch today, but altered the placement of the elements a touch to suit the plan I had in mind for the card.
First, I used a Martha Stewart punch to punch out the snowflake, then I spread, Sparkle Medium over my trusty SSS Falling Snow stencil (I'm getting a lot of use out of those two items this year), then I left it to dry.
Whilst it was drying, I punched the snowflake out again, but this time out of SU Glimmer paper. When it was dry, I adhered a piece of blue foil card behind the aperture and adhered the front panel to a card base.
Next, I stuck the glitter snowflake back in the void and popped the 'outer bits?' (I know that doesn't sound right, but I don't know what you would call them) up with tiny slivers of foam tape for a little dimension and to allow the foil card to peep out.
Finally I finished off with a layered sentiment banner to match the rest of the card. Here it is.
Well, my lovelies, I think that will be me for the weekend now, as I am very behind with my Christmas cards and still need to make a ton . . . where has this year gone, I'd like to know?
I hope you all have a great weekend . . . ours is very wet and very windy - I could say something here, but I won't ;) Hazel xx
Friday 27 November 2015
Freshly Made Sketches #214 - A Sketch by Jen T
Today's card is for the Freshly Made Sketches #214 challenge, which is a sketch by Jen T. This is her great sketch.
This card was heavily influenced by a video that Tami White did on You Tube and I have gone slightly off the positioning of Jen's terrific sketch and I have used a bauble instead of a snowflake, but I think (hope) it's close enough. Here is my card.
First, I cut the SU bauble out of white, gold foil and black glitter card-stock, then, I used the SU framelits to cut the Santa sleigh from the white card-stock, the houses out of the black glitter card-stock and then the Christmas sentiment out of gold foil card-stock with a Clearly Besotted die.
Next, I layered up the bauble pieces, attached some gold thread and used SSS 'Falling Snow' stencil to add some glitter via some Gold Sparkle Gel - love that stuff - on to a slightly smaller panel.
When all was dry, I adhered the bauble with some foam tape and the panel on to the base card, also with foam tape.
I just love all that sparkle and shine! Thank you for your visit today and for any comments you leave, I really appreciate it! Have a lovely day! Hazel xx
Wednesday 25 November 2015
A Shaker Card For My Christmas Stash
I know that I have been a little remiss this week with my posting and I apologise, but I have been cataloguing my cling stamps, all the clear ones are up to date now, most of the dies are done and I have started on my cling stamps (mostly SU).
However, I bought a 'Simply Cards & Papercraft' magazine and it had a lovely stamp set and matching embossing folder that came with it and I felt that the snow-globe was crying out to be made into a shaker.
I stamped the snow-globe on to a panel of card-stock to match my base card, cut a hole with a circle die, coloured the snow-globe base, stamped a sentiment from the same stamp set and spread some 'sparkle gel' through a SSS 'Falling Snow' stencil.
Meanwhile, whilst the sparkle gel was drying, (disappointingly, not very sparkly, it turns out) I made up my shaker. I used some chunky iridescent glitter that I have by popping it into a small see-through bag and stuck that down behind the window with scotch tape.
Finally, I mounted the whole thing on to my base card with foam tape. Here it is.
That's it for me today, my dear, crafty friends. Thank you for your visit and if you left a little love, thank you, it's most appreciated and I will reciprocate! Have a lovely day! Hazel xx
Friday 20 November 2015
A Card For My Christmas Stash & Trying A New Toy
Today my lovelies, I have a card that I made a couple of days ago, but I didn't post it then as I have been trying out a new 'toy' . . . a light-box DH bought me for my birthday - because the lighting this time of year here in my part of the world is very unpredictable! My good friend Loll of Stamping With Loll was helping me decide whether it was worth it or not, as I was unsure. We decided that it was, so here are those pictures.
For this simple card, all I did, was make a circle mask, by cutting a circle out of a piece of copy paper and lightly sponge some distress ink through the stencil and then spread some sparkle gel through a stencil, the name of which escapes me at the moment as this was just to try out the light-box. The panel was cut out with a WPlus9 die from the 'Sunshine Layers' set.
I finished off with some silver twine from Stampin' Up and a blue gem, stamped the greeting from a Crafty Impression set called, 'Christmas Bauble Sentiments' with Encore Silver pigment ink, brushed with silver Perfect Pearls powder and then mounted on to a base card with foam tape.
Thank you for visiting today and for your kind comments! Have a great day! Hazel xx
Thursday 19 November 2015
Muse Challenge #142
Today, my card is for the Muse Challenge #142 and the Muse card was provided by the talented Anita Bowden of Neet & Crafty.
This is her fabulous card
I loved the aqua shade she used and the general layout. Everything, from the sweet little tag, the hearts, the leaves to the lines she embossed as a border for her main focal point. I loved it all!
This is my take on her card.
First, I cut the top panel a quarter of an inch smaller than my card base, then I cut a strip of patterned paper from my stash to go across the front of the card where Anita did that gorgeous stamping. Once adhered, I ran across the back with my bone folder to create the border lines.
Next, I made two little mini tags by just cutting them by hand - I don't have a tag die that small - then I stamped the greeting on the white tag and sponged the edges of both tags with the same ink as the sentiment.
Then I used some die-cut leaves from my stash to represent Anita's leaf stamping. After that, I took my ink pad and went directly to paper for the matching hearts and used my Martha Stewart punch to punch them out. I used foam pads for dimension and layered everything up - except the leaves, which were adhered flat.
Finally, I mounted the whole panel to my base card and added some WOS to the leaves and hearts.
Thank you for your visit today and for any comments, you are all very much appreciated! Have a great evening! Hazel xx
Monday 16 November 2015
Another Mixed Media Tag For Loll's Twelve Tags Of Christmas
Today I have another tag for Loll's Twelve Tags Of Christmas Challenge
Which as you all know is on until the 15th November, so still time for you to join in the fun! If fun isn't enough of an incentive - though I can't see why it wouldn't be? - Loll is also generously giving away prizes!
Which as you all know is on until the 15th November, so still time for you to join in the fun! If fun isn't enough of an incentive - though I can't see why it wouldn't be? - Loll is also generously giving away prizes!
Winner - $40 gift certificate from STAMPlorations
Top Three - $20 gift certificate each from STAMPlorations
Random Draw - $20 gift certificate from Happy Little Stampers
Random Draw - One Christmas stamp set from Dee's Artsy Impressions
This is my tag today:
This is how I achieved this look:
1. Blend various shades of green distress ink all over the tag
2. Stamp Poinsettia randomly over the tag in a pale olive colour
3. Stamped same Poinsettia in lower left corner in Silver pigment ink
4. Stamp 'music' small background stamp in black in top left corner
5. Apply sparkle gel through a snowflake stencil all over tag
6. Once all is dry, mount sentiment strip on to tag with foam tape
7. Top it with a bow (made from a scrap of ribbon that was laying around)
8. Finishing touch was a sparkly gem 'thingy'
Thank you all for all your very kind comments throughout this challenge, I appreciate every one of you!
Have a wonderful week! Hazel xx
Saturday 14 November 2015
A New Challenge To Me & Guest Designing!
Today I have the great honour of being a guest designer over at the uber talented Loll Thompson's blog 'Stamping With Loll' for a challenge - mixed media tag challenge - that was new to me (and also a technique that was new to me too . . . doubly scary!)
Twelve Tags Of Christmas Challenge
Of course I was thrilled to be asked, but mixed media . . . gulp. I told Loll that I would love to be a guest, but I wasn't even sure what constituted 'mixed media' . . . I needn't have worried because anyone who has had any dealings with Loll will know how sweet and generous and helpful she is. She explained that I was probably making things that would already constitute 'mixed media' without even realising it!
So, I made a selection of tags to Loll's specification and sent her pictures and she told me that they all fitted and to choose my favourite. As Loll has a liking for these colours, I chose this tag in honour of her.
First, I made a Bokeh piece and die cut a stitched tag from it, then I stencilled stars with glitter gel all over it and whilst it was drying I die cut a few snowflakes and did the sentiments.
When all was dry, I adhered the snowflakes, putting enamel dots in the centres and popped the sentiment strips up on foam tape for dimension and finished it all off with some black, organza ribbon.
Why not join in the fun over at Loll's blog and show us your tags!
As if more incentive was needed, Loll is also generously offering prizes too!
I would like to take this opportunity to thank Loll publicly for her faith in me, whenever I doubted myself and for being so sweet as to take a chance and give me my very first opportunity at being part of a DT . . . thank you, thank you, thank you Loll from the bottom of my heart!
Thanks too to all of you, my lovely readers throughout this past year who have supported me and left me such sweet comments and words of encouragement!
Now, what are you waiting for . . . get tagging! Hazel xx
Twelve Tags Of Christmas Challenge
Of course I was thrilled to be asked, but mixed media . . . gulp. I told Loll that I would love to be a guest, but I wasn't even sure what constituted 'mixed media' . . . I needn't have worried because anyone who has had any dealings with Loll will know how sweet and generous and helpful she is. She explained that I was probably making things that would already constitute 'mixed media' without even realising it!
So, I made a selection of tags to Loll's specification and sent her pictures and she told me that they all fitted and to choose my favourite. As Loll has a liking for these colours, I chose this tag in honour of her.
First, I made a Bokeh piece and die cut a stitched tag from it, then I stencilled stars with glitter gel all over it and whilst it was drying I die cut a few snowflakes and did the sentiments.
When all was dry, I adhered the snowflakes, putting enamel dots in the centres and popped the sentiment strips up on foam tape for dimension and finished it all off with some black, organza ribbon.
Why not join in the fun over at Loll's blog and show us your tags!
As if more incentive was needed, Loll is also generously offering prizes too!
Winner - $40 gift certificate from STAMPlorations
Top Three - $20 gift certificate each from STAMPlorations
Random Draw - $20 gift certificate from Happy Little Stampers
Random Draw - One Christmas stamp set from Dee's Artsy Impressions
I would like to take this opportunity to thank Loll publicly for her faith in me, whenever I doubted myself and for being so sweet as to take a chance and give me my very first opportunity at being part of a DT . . . thank you, thank you, thank you Loll from the bottom of my heart!
Thanks too to all of you, my lovely readers throughout this past year who have supported me and left me such sweet comments and words of encouragement!
Now, what are you waiting for . . . get tagging! Hazel xx
Friday 13 November 2015
Again With My Latest Crush - White & Gold and Learning From Mistakes
Today's offering is another 'white & gold' favourite! This time, it's just for fun - it's not quite there enough for a challenge - my first mistake was stamping the gold sentiment on to white textured card, the second mistake was the pearlescent embossing paste - I don't think it went very well with the rest of the card - and the final mistake was using my 'gold' WOS on the edges of the petals of the Poinsettia.
I thought it only fair to show a 'mistake' card once in a while - not every time, otherwise I'd have to rename the blog 'My Card Failures'.
Anywho, here it is for what it's worth.
Well, that's it for today my lovelies . . . go forth and craft . . . and don't make the same mistakes that I have! Have a lovely day! Hazel xx
Subscribe to:
Posts (Atom)


