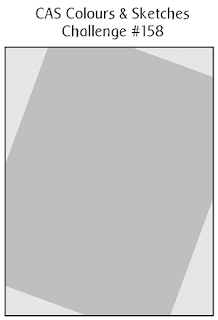
Today's offering is for two challenges. The first one is a sketch challenge. CAS Colours & Sketches Challenge #158
This is the sketch.
The second challenge is another one for 'Pixie's Snippets Playground'
The snippet used was the focal layer, which had originally been the size of a full card front, but I had made a boo boo and had chopped a piece off, which then made it too small. So it has been lying around ever since, but it worked out the right size for the sketch card.
I used a new stencil that arrived yesterday. It was a Crafter's Workshop stencil, called, 'Four Feathers'
and it is two feathers, each with two layers (or four separate) feathers.
First, I sponged the base feather with lilac pigment ink and then I used some new Cosmic Shimmer 'Gold Pearl' texture paste through the top feather layer and heat embossed the sentiment in WOW 'Gold Pearl' embossing powder. The sentiment was Clearly Besotted's 'Fancy Feathers'.
I finished the whole thing by drawing a fine line border around the edges with a gold glitter gel pen and a pearl on the 'stem' of the feather.
Thank you for visiting! You make my day with your lovely comments! Have a great one! Hazel xx
Friday 29 January 2016
Monday 25 January 2016
Mum's 90th Birthday Bash
My darling mother is 90 today and she is in love with bling, if it shines, glistens or gleams, she's like a fascinated cat . . . she ooohs and aaahs . . . LOVES it!
So, yesterday, the whole family had a get together meal in a local pub because those who worked wouldn't be able to make it today.
My youngest brother flew over from Cyprus (he moved over there about 12 years ago and has only been able to return for a visit one other time!
There were, five of us 'children', associated partners, three grandchildren, with partners and two great grandchildren.
So, in honour of Mum, today's card is the card I made for her . . . FULL of bling . . . it couldn't be blingier . . . is that even a word?
Unfortunately, I had made the card out of a full A4 sheet (in order to maximise the bling) and so, it ended up rather too large for my SSS tiny hearts stencil and unfortunately, you can see the join. I tried to minimise this by randomly wiping off some of the tiny hearts before the Sparkle Medium had set, but I'm not sure it worked that well! I also added some dots of gold Stickles in balder spots for filling. But, Mum being Mum, didn't notice, because,
(a) all the bling blinded her to it's faults, and,
(b) it was made by one of her 'wonderful' children - anything we do is wonderful in her eyes - bless her (blinded by love) - she still proudly shows everything we 'children' make or do to any unsuspecting visitor to the house, including, postmen, tradesmen . . . even her chiropodist doesn't escape!
Anywho, this is her card.
The balloon was the largest from my Simon Says Stamp 'Balloon Dies', the little hearts was a SSS 'Tiny Hearts Stencil' with Imagination Crafts, 'Gold Sparkle Medium, the 'Celebrate' die-cut was from a die that I had purchased pre-organisation, so I can't say who it is from I'm afraid and the gold foil 90 was some MFT number dies.
To finish, I want to share the poem I wrote for my Mum,
Mum, I thought I'd make your card, a bought one wouldn't do.
I need to tell you personally, just what I think of you.
You are the kindest, sweetest Mum, a person could have had.
You made me what I am today, for that I'm very glad.
You brought me up and nurtured me, and showed me how to care.
For all events throughout my life, always you were there.
When times were bad you taught me, I needed to be strong.
And when there was temptation, you taught me right from wrong.
The life-skills that you gave to me, were always very good.
You gave me what I needed, just like a Mother would.
But then you went beyond all that, and gave me even more.
You gave me love and friendship, you opened up life's door.
Then when I was an adult, you taught me how to fly.
You let me out and set me free, and then you had a cry.
You let me go but wanted, to still hold on to me.
Then when I flew, you watched me, and smiled so happily.
Now today it is your Birthday, and I wanted you to know.
I love you now as always, I just had to tell you so.
So have a lovely Birthday, with happiness to own.
From a daughter who still needs you , even though she's grown.
Thank you all for indulging me today. Have a wonderful week! Hazel xx
Thursday 21 January 2016
Another 'Snippet' Card
As you all will probably realise, this week I have been making cards just for the 'fun of it', getting back to my hobby, so-to-speak. Sometimes I think that I have got so caught up in the 'challenges' that I am always making cards to 'spec'. That's great, I enjoy that too, having the 'focus' and 'reason' to craft, but just occasionally, I like to sit at my desk and let the cards 'speak to me' . . . I know, I sound like a third rate clairvoyant!!
Seriously though, I sometimes like to just sit at my desk and go through, die-cuts that were 'trials', backgrounds that were 'technique try outs' and my folders of 'snippets' - bits of card left over from previous projects and scraps of patterned paper. This week has been one of those weeks and I have had a ball!
So, here is another card, in which I used those 'snippets' and a butterfly I had coloured in with my coloured pencils. I am again linking this to the lovely Di's 'Pixie's Snippets Playground' where anything goes as long as you use some snippets.
Here are the rest of the pictures.
For those of you, who I know will ask for details of the embossing folder used, it is a We R Memory Keepers 'Basket Weave' folder. Have a wonderful day/evening and thank you for stopping by! Hazel xx
Wednesday 20 January 2016
Stencils, Snippets & 'Enamel Dots'
Well, my lovely friends, I am posting this at 01:30 UK time! I didn't finish this card until this evening and then forgot that I hadn't posted it yet, so here it is.
As you can tell by the title of this post, I have been 'playing' with stencils again. Also, this is another card for Pixie's Snippets Playground as the butterfly layers and the sentiment strip were all made from snippets. The butterfly was die cut from a snippet of white card-stock and a snippet of vellum, which I coloured on the back with a marker to coordinate with the sponging I did through the stencil and the sentiment was heat embossed on a snippet of black card-stock. I finished off with a few of my home-made 'enamel' dots.
Well, all I need to do is now is show you the picture, sign off and go to bed!
Thank you so much for popping by and for any comments you might leave, I really do appreciate them all. Goodnight, I'm off now. Have a good evening/day whatever, you are doing!
Saturday 16 January 2016
Hobby Crafting
Hi all my lovely, crafty friends. I have been MIA for a few days because I have been cataloguing and filing my stencils. I finished my clear stamps (over 500), started on the cling sets - got through 60 and ran out of storage boxes for them - which meant they were pushed to the back of my mind and forgot about. But, I did do all my dies (over 250) and also made some 'enamel dots' (around 1100) with the Perler beads that I have seen all over You Tube.
So, as I already had my stencils in a box - haphazardly - and I had purchased an album and pages for them aka Michelle Short of the Card Grotto style. I decided to make a start on them as I don't have so many.
I catalogued 47 of them, then ran out of pages, so had to order more. Whilst I was cataloguing them, one that I hadn't used - as I had forgotten it in the chaos that is my craft room, jumped out at me - and an idea for a card formed.
So, I thought I would make a card for the fun of it. Since I started blogging, my cards have been largely made with challenges in mind, and I have thoroughly enjoyed them, they gave me focus. However, when making cards for challenges, although I enjoy it immensely, it isn't the same kind of buzz that I get from making a card, just for my hobby. So, this is what I did, and here it is.
First, I spread some embossing paste through the stencil, Prima Marketing, 'Finnabair Doily #2' on to a panel of white card-stock and left it to dry.
Whilst it was drying I applied a black and white patterned paper to the front of a card base and found the 'Hugs' die-cut that had been lurking in a drawer, since I made it months ago - as it was cut at the time from a snippet of black card-stock I thought I would enter it into the challenge run by my friend and yours, Di, from Pixie's Snippets Playground a challenge that I kept forgetting last year, but vowed to try and remember it this year!
I covered the 'Hugs' in WOS and Glossy Accents and although the photos do not do justice to it, it sparkles like crazy! I cut the panel shorter than the card front and added a strip of black glitter card to the join and inside bottom border to finish it off.
Well, that's it my dear friends, oh, but before you go, I just thought I might post a quick picture of my collection of 'enamel dots' that cost me approx £10 ($14) as opposed to £5 for a small pack of shop bought enamel dots.
Thanks for stopping by today and for any comments, I appreciate each and every one of you. Have a lovely weekend! Hazel xx
Tuesday 5 January 2016
Changes To Blogger
I have been alerted by my dear friend Loll, to new changes to Blogger, which affects all followers!
Effective January 11, 2016, only Google account holders will be able to follow blogs with Blogger. After that time Blogger will remove any followers without a Google account from the blogs they are following.
To see the full announcement from Google, go HERE
I hope you'll still want to follow my blog, and if you do, you have a couple of choices in order to continue to follow.
You can create a Google Account. Then you would need to become a Follower again because Google will permanently remove all previous Followers who did not have an account!
If you do not wish to open a Google account, you can still follow my blog via email (if following by e-mail you will get each new post sent direct to your inbox) or you can follow on Bloglovin'
Sorry folks :(
Experimenting With Props & A Challenge
Hello to you, all my lovely, fellow bloggers, friends and followers! Well, Christmas and New Year is well and truly over now, the decorations are put away for another year and I am having a bit of a break from Christmas card making - although I do want to start making some in readiness for this year, I'm determined not to get caught out again this year - I have been busy during my blog break and I have been working on something that should save me some money (nothing too ground breaking) but I haven't finished yet, but when I do I will show you all!
These past few days I have also been experimenting with something else too. I had made up a couple of cards with 'snippets' laying around in my craft room and was photographing them for Pixie's Snippets Playground I had promised Di that I would try not to forget this shamefully forgotten challenge (by me) this year when I use 'snippets'.
Now, back to the experiment. Whist I was putting away the Christmas decorations, I wondered if I should try our small battery operated string of fairy lights as props, so that my pictures had a little extra interest, but I'm not very sure about it . . . maybe you all could help. The first photo will be with the lights (I think they are a little too big as props for card photography, so I might try some smaller ones) The other two photos are as I normally do my photographs. I will explain the 'snippets' at the end of this post, so those of you who want to get on can get on, as I realise I am 'waffling' here!
The snippets used for the first card - which, I admit, may be stretching it a bit as a 'snippet', but it was a panel I had stamped quite a while ago and wasn't sure how I wanted to finish it off, so I won't enter that one!
The snippets used, on the second card are the poppies that I had coloured quite a long time ago and were shoved in a drawer, the patterned paper and the two pieces of cardstock used for the sentiment.
Let me know what you think about the lights as props - smaller ones of course - would you prefer, with or without? As always, thank you for your visit today and have a fabulous day! Hazel xx
Saturday 2 January 2016
Happy New Year!
Happy New Year to all of you, my lovely lovely blogging friends! I trust everyone had a wonderful Christmas and hope you all have a very happy year to come!
My, how 2015 wizzed past and I am hoping that 2016 will take a more leisurely pace . . . though, I suspect not!
As it is the start of a New Year, that must also mean the start of a new CAS challenge over on the Happy Little Stampers blog and this one is for 'Smooshing'
Kylie is very generously sponsoring the challenge again and giving away one of Happy Little Stampers very own stamp sets!
Without further ado, let's look at my card for this, our very first challenge of 2016!
The first thing I did was to take a panel of watercolour paper and make the background piece, by using my Distress Ink pad in Picked Raspberry on a craft sheet and spritzing it with water - I also spritzed the watercolour panel with water too, in order to allow the ink to move, then smooshed it into the puddle of ink.
I let the panel dry and then dabbed the dry panel down in the wet ink again and repeated this a couple more times, until I got the look I was going for.
Next, I cut the word Happy out of the panel with a die from Clearly Whimsy and twice more out of white cardstock and layered them on top of one another for dimenson.
Then, I cut a white panel out, smaller than the watercolour panel with a Lawn Fawn Stitched Hillside die and mounted that on to the watercolour panel with foam tape. I then adhered the whole panel on to a white card base.
I finished off by adhering the die cut word on to the card and stamped the rest of the sentiment from Avery Elle's 'Label Love' stamp set and mounted that with foam tape.
Finally, I added a few enamel dots in pink and black to tie the whole thing together.
Why not join in the fun and pop along to see all the other fabulous designs made by my fellow team members and enter to stand a chance of winning a prize!
That's it for this first post of 2016, thanks for stopping by and for all your support and love during 2015!
May this year bring all nice things to your lives! Hazel xx
Subscribe to:
Posts (Atom)


