
Hi all my lovely, crafty friends. I have been MIA for a few days because I have been cataloguing and filing my stencils. I finished my clear stamps (over 500), started on the cling sets - got through 60 and ran out of storage boxes for them - which meant they were pushed to the back of my mind and forgot about. But, I did do all my dies (over 250) and also made some 'enamel dots' (around 1100) with the Perler beads that I have seen all over You Tube.
So, as I already had my stencils in a box - haphazardly - and I had purchased an album and pages for them aka Michelle Short of the Card Grotto style. I decided to make a start on them as I don't have so many.
I catalogued 47 of them, then ran out of pages, so had to order more. Whilst I was cataloguing them, one that I hadn't used - as I had forgotten it in the chaos that is my craft room, jumped out at me - and an idea for a card formed.
So, I thought I would make a card for the fun of it. Since I started blogging, my cards have been largely made with challenges in mind, and I have thoroughly enjoyed them, they gave me focus. However, when making cards for challenges, although I enjoy it immensely, it isn't the same kind of buzz that I get from making a card, just for my hobby. So, this is what I did, and here it is.


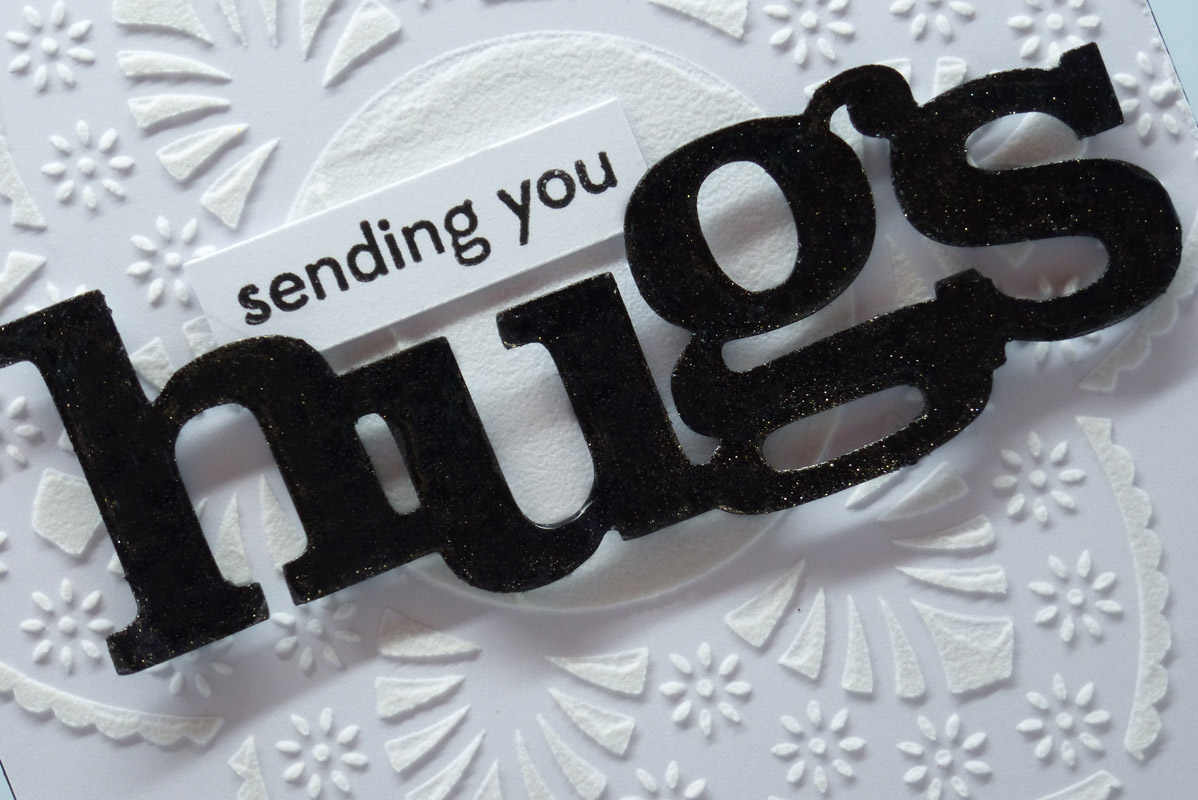
First, I spread some embossing paste through the stencil, Prima Marketing, 'Finnabair Doily #2' on to a panel of white card-stock and left it to dry.
Whilst it was drying I applied a black and white patterned paper to the front of a card base and found the 'Hugs' die-cut that had been lurking in a drawer, since I made it months ago - as it was cut at the time from a snippet of black card-stock I thought I would enter it into the challenge run by my friend and yours, Di, from Pixie's Snippets Playground a challenge that I kept forgetting last year, but vowed to try and remember it this year!
I covered the 'Hugs' in WOS and Glossy Accents and although the photos do not do justice to it, it sparkles like crazy! I cut the panel shorter than the card front and added a strip of black glitter card to the join and inside bottom border to finish it off.
Well, that's it my dear friends, oh, but before you go, I just thought I might post a quick picture of my collection of 'enamel dots' that cost me approx £10 ($14) as opposed to £5 for a small pack of shop bought enamel dots.


Thanks for stopping by today and for any comments, I appreciate each and every one of you. Have a lovely weekend! Hazel xx
OMG..lots n lots of organizing work ! I agree with you the satisfaction of creating just for hobby is something different ,Loved your monochromatic card !
ReplyDeleteHazel I really love your card. The paste through that beautiful stencil looks so pretty and the black sparkly "hugs" is perfect.
ReplyDeleteMy goodness you have been busy. I wish I was as organised. I try but get side tracked and wow! all those lovely enamel dots. You got a real bargain. They're really super and will last a long, long time. Barbxx
What a gorgeous card! Love that stencil and the way you used it!
ReplyDeleteLots of numbers in your post! I am always afraid of counting my stamps because I think I would faint if I would see the number! Discovered this week that my storage space for my dies (an Art Bin case with magnetic sheets) is full now and I have to think about what to do now. Buy another bin or start a different system?
And those enamel dots will last you for a while! Love the two-coloured ones!
Keep on organising and telling us about your progress! I admire you for it!
Love your classy black & white card Hazel.
ReplyDeleteGoodness and I thought I had a big stash of craft supplies ;-)
I stopped cataloguing after 20 stamps and 5 dies LOL
I am not so persistent and brave as you are. BUT I DO have binder with a print (that i stamp myself) of EVERY single stamp I have and that is also catalogued by brand. So I do have something at least LOL
Enjoy the weekend my friend, hugs Veerle xx
Oh, what a gorgeous card!! I love the stencil you used!! The entire design is just so elegant and beautiful!! I love, love it!! When you finish organizing your craft room, will you please come organize mine?? I started to organize my dies and became overwhelmed with the task and just stopped!! I need some serious organizational help!! Have a great day my friend!! Big hugs :)
ReplyDeleteLisa
A Mermaid's Crafts
First of all, Hazel, your just-for-fun card is a dazzler! I love the design!! And, secondly, way to go with that massive reorganizing you've got going on! It certainly seems to be the thing to do this time of year for a lot of us. I sometimes think I like reorganizing better than I do making cards, ha. You certainly do get a different and lovely rush from a completed section or genre!! Your enamel dots are fantastic!! TFS!! Hugs, Darnell
ReplyDeleteWhoa! That doily is awesome! I am SO IMPRESSED with you getting your cataloging on! I wish it wasn't so overwhelming - I think daily of getting started.... :)
ReplyDeleteBeautiful card, Hazel! That doily stencil is gorgeous and you've made it the star of your fabulous card! Great job on the enamel dots, too - I did this about a year ago and still working my way through them.
ReplyDeleteGorgeous card Hazel. It's always fun to make a card just because. And always good to use something that's been waiting for some love --- your doily stencil is beautiful and so much dimension withe the paste. Great job on the pearler beads. Looks like you are set with candy dots to last you a while! :) I have gotten my clear stamps, dies and stencils catalogued, but need to fix the filing system I have. It will come together at some point. Thanks again for the advice on Evernote, I'm finding it very handy for organizing my craft room, and I have also used it to make an address book for family, friends, and a special one for stamping friends. :) xx
ReplyDeleteHi Hazel! What a fabulous card - and I do so agree about it being more fun to make a card just for the fun of it rather than being 'driven' by a challenge. Ha - unless you're using snippets of course!
ReplyDeleteAnd that brings me to why you couldn't link up earlier today. Whilst doing the weekly write-up after Mr Linky had expired I broke off as Loll had already had trouble linking yesterday and I'd only just spotted the email. In the end I had to re-open Mr Linky and do some quick tinkering around and then I quickly closed it again. THAT would be why you saw Mr Linky open for a further hour and then all of a sudden closed by me once I'd sorted Loll's link out. So, you can blame me for it!
But, DO please link this lovely card into the Playground anyhow - the new Mr Linky is open and I'm pretty laid back about folk doing a bit of back linking anyhow - all the more so when I caused the confusion! Loll will be back linking her gorgeous mauve flower card too :)
See you on the swings honey!
Hugs
Di xx
It's me again Hazel - in all the excitement about linking your beautiful card (LOVE that die BTW!, I forgot to say how impressed I am with your sorting and cataloguing of stamps. AND, oh my word - your 'enamel' dots are just amazing! Could you please share some info. on how you made them - I've seen stuff on the internet but yours are just perfection. And I especially love the 'humbug' style ones - those are just soooo cool! xx
ReplyDeleteI found (after many failures) that the best ones work by sticking with the following things (for me anyway)
DeleteNot all beads are born equal, the cheap ones are useless, they melt all out of shape and end up like a cross between a pancake and a ring doughnut. I bought the genuine ‘Perler’ brand of fusible beads from Amazon.
There are many YT videos that state that people are getting the best results from a very hot oven (I found that that just scorched the beads) I set my top oven (not my fan oven) on a low preheated – 150 degrees C – and just stood them up, spaced out on a baking sheet and turned the tray every so often until they were melted.
Just keep checking them, as different colours take different amounts of time, on average, they took 25-40 mins (depending on colour)
Don’t try the ‘pearly’ ones – they melt fine, but they have a little spot on top that looks like a pimple and no matter how long you leave them, it just won’t go away.
When you get a new batch of beads, err on the side of caution, use low heat settings and check every 10 mins or so and jot down timings and heat settings, along with your findings.
Be prepared for casualties, the first two packs I bought had to be thrown away and then the first two or three trays from the successful batch had to be ditched too, until I got the temperature down pat and the timings worked out.
Wow Hazel, this card is just stunning! I love that stencil you used, so pretty. Love the black polka dotted paper and the big shimmery hug. I can see why you wanted to use that stencil Hazel. Once again you have wowed me. Look at all those enamel dots you have made! I have a ton sitting waiting for me to make them into dots too. But I don't have any of those swirly ones that look like candy! I'm in love with those. lol Don't you love how easy they were to make and how cheap?!! Hugs, Brenda
ReplyDeleteWow, you have been super organised! I'm impressed you've managed to sort out all those dies, stamps and stencils. I'm enjoying my crafty reorganising too. There's something so refreshing about getting something the way you want it. To the card - how fortuitous you found that stencil because it's fabulous with the bold glossy sparkly black sentiment die. A really classy card. Most impressed with your enamel dots too - they turned out beautifully smooth. Happy crafting!! xx
ReplyDeleteFantastic multimedia card you have here Hazel. And WOW you've been organised. Wanna come round and do mine? Good work on the enamel dots too and thanks for sharing your tips for making them in response to Di's question.
ReplyDeleteHugs, Sarn xxx
ooooohhh....lovin' this Hazel!
ReplyDeleteGorgeous CAS! Love the classy black and white with the texture and dimension!
ReplyDeleteThis is a gorgeous stenciled doily...bet applying the paste into all the little tiny crevices was a bit fiddly but it certainly turned out beautifully & so delicate. It's a marvelous look with the snippet of dots paper too! And I love the bold hugs. The G.A. doesn't always shine in the photo, as IRL. Love your perler dots too. I've not tried this technique yet, but my sweet Brenda (http://friendscraftinwithfriends.blogspot.com/) had sent me some a while back...and then I forget to use them. Not great with sequins, pearl dots, etc. although I surely do like them! Glad you took time to make a card 'just because', and you're my Hero for continuing on with the tremendous organization task! TFS & Hugs.
ReplyDeleteBeautiful card...love it! And your dots are fabulous, you are so organized.
ReplyDeleteMy goodness girl, you are so very organized!
ReplyDeleteI have been organizing my cling stamps...rubber and acrylic. I ran out of the heavy weight paper I was using to slide behind them in the clear envelopes. The one I use has a bit of a sheen to it as I find that one stays nicest when slightly mucky fingers slide the stamps in and out. lol
Your card is lovely...a real stunner!
This card is so elegant. I love how you have used that stencil! Lucky you have been catagorizing! I have done that over the holidays too. I love all your enamel dots. They look so fantastic in your storage container!!
ReplyDeleteOH, my, Hazel, this is one absolutely STUNNING card, my friend!!!! A B&W masterpiece!!! Perfect in every way and so, so beautiful!!!! The stenciled bg is fabulous, the sentiment so wonderfully done and the polka dots at the bottom ...brilliant!!! You can tell I love, love, LOVE it, hey!!!!!
ReplyDeleteWOW, you've got an enormous amount of stamps and dies and stencils ...and enamel dots, my friend!!! I've seen on the net that you can use perler beads to make your own enamel dots, but I can't find any over here and to get some from overseas will cost a small fortune with the weak SA Rand!!! I couldn't believe the cost of the enamel dots when I first saw some in Cape Town - I was planning to buy some, but when I saw the price I decided that I will have to make cards without enamel dots!!!! Sounds as if you are almost done with all the sorting out and cataloging of everything!!!! I can just imagine what a great pleasure it must be to make cards now, knowing what you've got and being able to find it immediately!!! Enjoy!!!
Have a wonderful evening - supper time here!!!!
Hugz
PS. Will respond to your last e-mail a bit later tonight.
Hazel, that stencil if faBulous. Loving all the dots you made too.
ReplyDeleteLooks like you've been a busy bee, Hazel. Can't wait to see all of your lovely 'makes' using these goodies. x
ReplyDeleteFab card Hazel, I do so love B&W cards!oooh I am so excited to make my own enamal dots now thanks for sharing the tip!...I may be back and asking more questions lol ;) Viv xx
ReplyDeleteOops forgot to say well done on the cataloging. I have sorted a few stamps out but really must try doing this too ;) Viv xx
ReplyDeleteFabulous card. I love the black and white colour scheme. I was going to ask you about the enamel dots, but then read you'd answered all my questions in your response the Di. Thank you! xx
ReplyDeleteWhat a striking card, loving the mono-chromatic colour-way. Such attention to detail and loving those enamel dots you've got x
ReplyDeleteWonderful texture on this card! I love the simple black and white colors which really makes that fun "hugs" die cut just jump off the front of this card!
ReplyDelete