Monday 29 February 2016

One Stamp Set, Three Cards & A Failed Experiment


This weekend just gone, I was 'playing' in my craft room.  My Mum had asked me if I could give her some thank you cards so she could thank people for her 90th Birthday gifts.  So, as I had been wanting to try some techniques I'd seen, I thought it was the ideal opportunity!  I already had a stamp set out on my table, ready for filing, so I decided to use it.

The first technique I wanted to try was a technique demonstrated on You Tube by Jennifer McGuire - she called it, 'Distress Ink Lifting'.  First, she took the distress ink pads direct to paper and smooshed it down, making a vibrant background and let it dry.

Next, she stamped some leaf images all over the background in Versamark ink and clear embossed them.  Next, she took a damp baby wipe/cloth and wiped over the surface, to lift some of the colour, leaving a darker, glossy pattern behind.

I don't know whether I left the panel to dry for  too long (I left it overnight, as I had gotten caught up doing other things), or if my card-stock was too porous for the technique, but my colour didn't lift like Jennifer's, but I still liked the effect and decided to still use it.

I cut it in half lengthwise and used it for two cards.  I then used the same stamp set for the other card and stamped the largest leaf over a panel of watercolour card and heat embossed them with white embossing powder.  Then I used some watercolour paints to colour them, just letting the paints do their own thing, then I splattered some paint on to the panel, cut  a die-cut sentiment and layered the whole thing up on to a card base, using panels of co-ordinating card-stock.

There you have it, one stamp set, three cards and a failed experiment! 

Here are the pictures.


Thank you for visiting, I hope you like what you saw, have a great week!  Hazel xx
Saturday 27 February 2016

Freshly Made Sketches #225 - A Sketch by Jen M


For the past few days I have been 'playing' with inks, paints, waxes, and watercolours in various forms and having a ball, with the result of having a stack of backgrounds  - that I love looking at, but have no idea what to do with them all!  Then I had a 'light-bulb'  moment and thought, why don't I make them the stars of various cards, so, here is one of them.

This card is for, Freshly Made Sketches #225 - A Sketch by Jen M and here is the sketch

http://freshlymadesketches.blogspot.co.uk/2016/02/freshly-made-sketches-225-sketch-by-jen.html
The panel on the right, was made by just scribbling some cheap markers on to a piece of card-stock and then adding water to soften it out, then when it was dry, I applied a light spritz of shimmer to it  and again, let it dry.

Next I mounted it flat to a white card base and made my focal piece by cutting a square of card and punched the edge with an EK Success border punch, adhered two black, die-cut leaves and popped a sentiment banner up on foam squares.

Finally, I mounted the focal piece to the front with fun foam (as it is thinner than my foam squares and I wanted to have a little less height to it but didn't want it flat) . . . I then decided retrospectively that I needed to tie the black elements in to the watercolour piece and went around it with a black Sharpie and a ruler, which made it look more 'finished'.

Here is my card.


I appreciate your visits and will reciprocate where possible!   Thank you all.  Have a great weekend!  Hazel xx

Thursday 25 February 2016

ColourQ Challenge #330


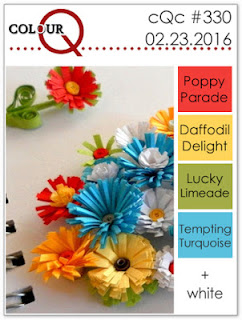
 Today's card is another one for the ColourQ challenge  as I was so inspired last week.  Here is this weeks inspiration picture.

http://colourq.blogspot.co.uk/2016/02/colourq-challenge-330.html

I love the beautiful, bright colours in this photo but I was unsure of whether you have to use just some of the colours, or all, so I opted for all - as all the wonderful examples by the talented team over there seemed to use all - it would also have been difficult to choose!  This is my card.


I started by making a card base.  Then I cut a strip of Tempting Turquoise Card stock and stamped an image repeatedly in Tempting Turquoise ink to make a self patterned strip which I adhered to the left hand side of the card.

Next, I cut a smaller panel out of white card stock for my focal piece.  Then I stamped my images  and sentiment on another piece of white card stock and fussy cut them all out.

I mounted all my images on to the focal panel, some were adhered with glue and others with foam tape for dimension.

I finished the whole thing by mounting the panel to the front of the card with fun foam, mounted the sentiment on foam tape and finished the whole thing with some matching gems.

Supplies used:

Inks: SU - Tempting Turquoise, Daffodil Delight, Real Red & Gumball Green
Stamps: SSS - Friendship Messages & W&W - In Bloom: Lola's Bouquet

Thank you all so much for popping by.  Have a truly wonderful day!  Hazel xx

Sunday 21 February 2016

Colour Q Challenge #329 Part Deux


As promised my friends, here is my second card for the Colour Q Challenge #329 and in case you are like me - with the memory of a goldfish - this is the fabulous inspiration photo again.

http://colourq.blogspot.co.uk/2016/02/colourq-challenge-329.html

This is my card


This time I used a piece of border from a die cut that I had lying around after I had 'test' cut it when it first arrived, so, I am also going to enter it into Pixie's Snippets Playground - Week 217 as well!

I adhered the die cut border to the bottom of the card base, added a few black, die cut leaves (also, from stash of snippets) and then cut a red rose and used the negative pieces - for the pop of colour - this was My Favorite Things 'Scribble Roses' and adhered this to the border and stamped another sentiment from the same Mama Elephant stamp set that I used on my previous card.

Thank you so very much if this is now your second visit today and I do hope you have all had a wonderful weekend, and that your following week will be wonderful too! I appreciate you all!  Hazel xx

Colour Q Challenge #329


Today, my card is for a new challenge (to me), as I loved the inspiration photo when I saw it and for once, an idea popped into my head immediately.  This is that photo and it is the Colour Q Challenge #329

http://colourq.blogspot.co.uk/2016/02/colourq-challenge-329.html

Isn't it wonderful?  So many possibilities!  As soon as I saw it, I knew what papers I wanted to use and what layout I wanted to do . . . don't-cha just love it when that happens?

Here is the card I made for it.


I used some pieces of patterned paper that I have in my stash (a Stampin' Up one I believe), then added a smaller panel on to the card front with foam and adhered the Scribble Heart from Sizzix and stamped the Mama Elephant, 'Everyday Greetings' sentiment.

Thank you for stopping by today and I hope you are having a lovely Sunday!  I will be back later as I have another design in mind for this challenge!  See you soon!  Hazel xx

Saturday 20 February 2016

Two Challenges & One Gelli Plate Background


Today I have two cards for you . . . first, the challenges.  The first challenge, is the Muse Challenge #153 and the person who supplied the Muse this week is, Tracey McNeely who supplied this wonderful card for inspiration.

 http://inmycreativeopinion.blogspot.co.uk/

I was struck by the three beautiful flowers in the left corner, leaving the rest of the card with lovely, white space and was reminded of a card I made just days ago when I was practising my colouring, so I decided to use the same image again.  I coloured it much the same, but mounted it differently, as I wanted to demonstrate it was indeed a different card, but also I wanted to use the lovely sketch provided by Jen Timco over at Freshly Made Sketches for challenge #224 and this is her sketch

http://freshlymadesketches.blogspot.co.uk/2016/02/freshly-made-sketches-224-sketch-by-jen.html
 I turned the sketch through 90 degrees and flipped it and now here is my card for both challenges.


The second card today was made from one of my Gelli plate backgrounds I made yesterday.  I kept it simple in order to let the background become the focal piece, so I cut it at a quirky angle and added a simple sentiment from the Mama Elephant 'Everyday Greetings' stamp set.  Here is that card


Thank you for visiting today.  Have a wonderful weekend my friends!  Hazel xx

** ADDENDUM ** 

After posting this, there was a number of questions about my geli plate, so here, to help further readers, is my refined recipe (I found a number of them on the internet and adapted them), this is what worked for me!

I can't say for sure that it is the same as a Geli Plate but it works as well as a regular gelatin plate and it won't mould or rot.
 
Here is the USA & UK recipe:  I have converted and added the measurements for the Western European folk (measurements in brackets)
 
6 Tablespoons gelatin (7 packets) - I used 100 grams, as I could only buy loose and that was the smallest size, but it worked fine!
1 1/2 Cups water (UK 355ml)
1 1/2 cup glycerine (UK 355ml)
 
I dissolved the gelatin in the glycerine then added the boiling water but you can just mix it all up and microwave it for a minute . .  easy!
 
 A few  tips:
 
  • Make sure whatever you use as a mould, make sure the bottom is perfectly flat (mine had a bit of a ‘bump’ in the middle and it comes out on all the prints)
  • When changing colours, just wipe the surface with a baby wipe, or damp cloth and go on with the next colour
  • If you can find something with a lid, you will be able to put the plate back in after use for storage.  When you have finished, just wipe clean with a baby wipe or damp cloth, let it air dry and store for next use.
  • If it gets too beat up, cut or scratched (used & abused) just clean it and melt it for 1 minute in your microwave on high and reset it!
 

Friday 19 February 2016

A DIY Day

No, sillies, not putting up shelves . . . moi?  No, this is about my day of making my own supplies!

The first thing I want to show you is my home made Gelli plate.  I have been watching You Tube videos - and there is a ton of them out there - showing you how to make your own Gelli plate!  Now, here in the UK the smallest one (6"x 6") is around £20 (approx $30) and the largest (8"x 10") is around £30 (approx $43), mine is approximately, 9"x 6.5" . . . so, a medium one, which cost me £3 . . . yes, £3.  It's a no brainer, you just need, gelatine, glycerine and water.

Now, in my experiment, I discovered a couple of things:

That I should have made sure my container was perfectly flat - mine was one of those plastic boxes, with a lid, you know the sort, they come in various sizes, that I think we all have, for storing, card, peel-offs, and all manner of crafty things - and although I didn't really pay much attention until I used the Gelli plate, mine had a dome in the middle where it was manufactured - hard to explain, suffice to say, I'm going to have to rethink the mould.

That I should only use the smooth side.  I saw the froth that had set on the top and thought it would make a cool texture . . . it doesn't . . . the paint just gets caught in all those tiny, set bubbles and makes a awful mess that won't come off.  Luckily, they say that if something happens to it, you can just melt it down in the microwave and reset it! 

The other thing that I made was a gold shimmer spray, that actually works!  In the past I have tried to make these sprays with, Perfect Pearls, Pearlex, Iridescent Acrylic paint and other various, shimmery things, but they all clogged the spray bottles!  I mean, I would only use them once and then they would just clog and no matter what I did, they would never unclog, even after taking them apart!  To be fair, I only ever bought the cheap spray bottles (trying to keep costs down), so that could have been the main reason.

This time, I thought I would actually buy the sprays that were made to do this very job, so I bought a three pack of Ranger Mini Misters.  The paint I used this time was made by Imagination Crafts (the same people who make the Sparkle Gel I am in love with)  the paint is called Starlights and let me tell you, when I use them I literally drool . . . they sparkle and shimmer like nothing else I have ever seen.  Apparently it is down to the real  metal flakes that they  use.  Anywho, I put a very small amount in a Mini Mister, topped it up with water and shook well.  I have now nearly used up a whole bottle (they don't hold very much) and they are still spraying well and the shimmer on these backgrounds is unbelievable in real life . . . as is always the case, a photograph just cannot capture the amazing beauty of these paints/sprays!

Well, thanks for sticking with me this long (if you are still here) and I will bore you no longer and show you the backgrounds I made with my new DIY supplies!

The mixture in the mould

The turned out Gelli plate


The Gelli plate inked up
My first batch of backgrounds made with the Gelli plate and generously spritzed with my Starlight spritzers


 A close-up of one of the BG's
 Thank you so much for popping by today!  Have a lovely day!  Hazel xx

Sunday 14 February 2016

Colouring Practice With Pencils


Hi everyone, I hope you are having a great weekend and Valentine's Day!  We actually have sunshine here today!  

As a lot of you will know, my colouring skills can leave a lot to be desired and I have tried all methods, bar, Copics, as they are too rich for my blood!  I have tried, watercolours - in various forms, from Peerless, to cheap, kids paints, markers of all types, from SU to Memento, through to the Stabilo 68 markers that everyone uses.  All my attempts come out rubbish.  

The only thing that I have a modicum of success with is pencils - ordinary, colouring pencils and watercolour pencils - from cheap, kids pencils through to Derwent Coloursoft, and pencils are the only colouring medium I seem able to control any sense!  So, I have given up on other methods and have decided to perfect the one medium that I have had some success with and stop stressing about all the others!

So, here is today's effort.


I also tried some ombre stamping with the sentiment, but think I needed two colours further apart in hue, as it just looks like I messed up with the stamping!

Thank you for your visit today!  Have a lovely evening!  Hazel xx