Showing posts with label FMS. Show all posts
Friday, 18 March 2016
Freshly Made Sketches #228
Hi all you lovely peeps, how are you all today, I hope you are having a good one? Today's card is for the Freshly Made Sketches #228 - A Sketch by Kim and this is her great sketch.
As soon as I saw it, I thought, 'I need to use a nice, big bloom there in that corner' and that was as far as it got until today . . . you all know how it is, you get caught up in 'things', and then, that's it . . . forgotten, until today!
Anywho, the first thing I did was to get out another piece of my background stash - it was only about four inches wide, so I cut it in half lengthwise and adhered the two halves down each side of a white card base and then I cut a panel, smaller than the card front to use as my focal piece, but when I held it against the side strips on my card base I felt it needed something to break it up a bit - hence the orange strips.
Next, I got out my Penny Black 'Patina' stencil (I first used a big bloom stamp, but it wasn't big enough), so I sponged some Hero Arts orange dye ink through the stencil, fading off a bit towards the middle, so it had a little dimension and then I adhered it to the front of the card with fun foam.
Finally, I used a Happy Little Stampers sentiment from the 'Mix Mash' set that only arrived today (very quickly from Australia to the UK I must say!!) on to a piece of matching, orange card-stock and embossed with white embossing powder. I then, fussy cut around it and left a thin strip as a kind of 'grounding' for the sentiment, but on reflection, I wish I had only had the strip on the right and not carried it straight across to both borders . . . what do you all think?
Here is my card.
As the card sentiment says, thanks so much for stopping by and I hope you all have a wonderful upcoming weekend! Hazel xx
Saturday, 27 February 2016
Freshly Made Sketches #225 - A Sketch by Jen M
For the past few days I have been 'playing' with inks, paints, waxes, and watercolours in various forms and having a ball, with the result of having a stack of backgrounds - that I love looking at, but have no idea what to do with them all! Then I had a 'light-bulb' moment and thought, why don't I make them the stars of various cards, so, here is one of them.
This card is for, Freshly Made Sketches #225 - A Sketch by Jen M and here is the sketch
The panel on the right, was made by just scribbling some cheap markers on to a piece of card-stock and then adding water to soften it out, then when it was dry, I applied a light spritz of shimmer to it and again, let it dry.
Next I mounted it flat to a white card base and made my focal piece by cutting a square of card and punched the edge with an EK Success border punch, adhered two black, die-cut leaves and popped a sentiment banner up on foam squares.
Finally, I mounted the focal piece to the front with fun foam (as it is thinner than my foam squares and I wanted to have a little less height to it but didn't want it flat) . . . I then decided retrospectively that I needed to tie the black elements in to the watercolour piece and went around it with a black Sharpie and a ruler, which made it look more 'finished'.
Here is my card.
I appreciate your visits and will reciprocate where possible! Thank you all. Have a great weekend! Hazel xx
Saturday, 20 February 2016
Two Challenges & One Gelli Plate Background
Today I have two cards for you . . . first, the challenges. The first challenge, is the Muse Challenge #153 and the person who supplied the Muse this week is, Tracey McNeely who supplied this wonderful card for inspiration.
I was struck by the three beautiful flowers in the left corner, leaving the rest of the card with lovely, white space and was reminded of a card I made just days ago when I was practising my colouring, so I decided to use the same image again. I coloured it much the same, but mounted it differently, as I wanted to demonstrate it was indeed a different card, but also I wanted to use the lovely sketch provided by Jen Timco over at Freshly Made Sketches for challenge #224 and this is her sketch
I turned the sketch through 90 degrees and flipped it and now here is my card for both challenges.
The second card today was made from one of my Gelli plate backgrounds I made yesterday. I kept it simple in order to let the background become the focal piece, so I cut it at a quirky angle and added a simple sentiment from the Mama Elephant 'Everyday Greetings' stamp set. Here is that card
Thank you for visiting today. Have a wonderful weekend my friends! Hazel xx
** ADDENDUM **
After posting this, there was a number of questions about my geli plate, so here, to help further readers, is my refined recipe (I found a number of them on the internet and adapted them), this is what worked for me!
I can't say
for sure that it is the same as a Geli Plate but it works as well as a regular
gelatin plate and it won't mould or rot.
Here is the USA & UK recipe: I have converted and added the measurements for the Western European
folk (measurements in brackets)
6 Tablespoons gelatin (7 packets) - I used 100 grams, as I could only buy
loose and that was the smallest size, but it worked fine!
1 1/2 Cups water (UK 355ml)
1 1/2 cup glycerine (UK 355ml)
I dissolved the gelatin in the glycerine then added the boiling water but
you can just mix it all up and microwave it for a minute . . easy!
A few tips:
- Make sure whatever you use as a mould, make sure the bottom is perfectly flat (mine had a bit of a ‘bump’ in the middle and it comes out on all the prints)
- When changing colours, just wipe the surface with a baby wipe, or damp cloth and go on with the next colour
- If you can find something with a lid, you will be able to put the plate back in after use for storage. When you have finished, just wipe clean with a baby wipe or damp cloth, let it air dry and store for next use.
- If it gets too beat up, cut or scratched (used & abused) just clean it and melt it for 1 minute in your microwave on high and reset it!
Monday, 1 February 2016
Playing With Alcohol Inks & Two Challenges
The past couple of days has seen me getting mucky and having fun! I dug out some alcohol inks from when I first started out in card making and I had forgotten how much fun they could be! I took some snippets of glossy photographic card, sprayed with water and started dropping drops of the ink onto the wet paper and watching in awe as they rippled out into these pools of vibrant, fiery colours.
I only have three of these Adirondack inks and four snippets of glossy paper, so I made four, small background pieces. Because of the snippets I am linking again to Pixie's Snippets Playground #214 and I am also linking to Freshly Made Sketches #221 following the wonderfully open sketch by Karren
As I was late making last years Christmas cards, I am going to try to spread them out this year, so it isn't such a rush. I thought this one would make a change from the usual type of Christmas cards that I usually make and so I used a Christmas sentiment.
Details below photos.
First I ran a plain, white base card through a WRMK embossing folder 'Gemstone', then I drew a thin border around one of the small background pieces with a gold metallic marker, I spritzed with some Tattered Angels Glimmer Mist (more old stock from around the same time as the Adirondacks). Then, after letting it dry completely, I heat embossed the sentiment - Clearly Besotted 'Brushed Greetings' in white embossing powder and finished off with three - yes, you guessed it - old 'gems' from stash!
Unfortunately the Glimmer Mist didn't photograph very well and it just looks like dirt, but in real life, it shimmers a stunning copper colour!
Thank you for visiting today and I will visit you in return! Have a lovely week! Hazel xx
Sunday, 20 December 2015
Last Post & Challenges For 2015 & A Word Of Thanks
Hello crafty beings!! I have some cards for you today, that will probably be the last until next year (maybe), some of which are for some last minute challenges and others are just for my 'stash'. I know you are all extremely busy at this time of year, but I just wanted to thank you all for following me, supporting me, and inspiring me throughout 2015. Without all of you, my fabulous blog friends and your continued inspiration my card making would have probably stagnated, instead - I think - it has grown and blossomed. So, thank you, thank you, thank you from the bottom of my heart. I can't wait to see what you all create in 2016!
Without further ado and no more 'waffling', here are the last of my cards.
First up is another card for the Freshly Made Sketches #217 - A Sketch by Linda
It is the 'negative' of the first one I made for this challenge. I am also entering it in the Happy Little Stampers CAS Challenge 'Favourite Technique', because my favourite technique of late has been 'negative die cutting'
This is the card, unfortunately I've just realised that you can't see the red foil peeking out from underneath that snowflake ... but it is there!
The next card is made from 'snippets' laying around on my desk and getting in the way. The snippets are, the striped piece that was made using black sparkle gel through a striped stencil and a flower that I had punched out quite a while ago, and I am going to enter that into Pixie's Playground I'm ashamed to say that I keep forgetting about this fun challenge and have neglected it during 2015. Sorry Di, I will try to do better in 2016!
Finally, the last two cards are just for my stash for next year - I'm determined not to be so behind next year - a couple of New Years resolutions in there somewhere!
There you have it my wonderful, wonderful friends, all that is left is for me to say is , have a truly magical Christmas wherever you are and whatever you do and I can't wait to see you all over in 2016!
Thanks for taking time out of your busy lives to visit! Hazel xx
Friday, 18 December 2015
Three Challenges Today - Inkspirational, Freshly Made Sketches & HLS CAS
Today, I wanted to quickly squeeze in a new challenge to me and also two of my favourites - fairly regular - challenges as they fit nicely together.
The first, which I might just make by the 'skin of my teeth' is the new one (to me) Inkspirational Challenge #97 and the prompt is 'Flake'
Well, it was meant to be wasn't it, considering the amount of cards I have made lately with snowflakes on them! The second challenge is for Freshly Made Sketches # 127 - A Sketch By Linda and this is her wonderful sketch.
Again, another 'meant to be' challenge as a lot of my designs lately has used this layout!
The third is Happy Little Stampers CAS Challenge - Favourite Technique and as it also uses one of my favourite techniques at present, 'negative die cuts' and the snowflake is just that, it is another 'match made in heaven' . . . a hat trick!!
This is my card
Happy Little Stampers is also sponsoring their challenge and the lucky winner will receive a stamp set from HLS own shop!
First, I used Sparkle Medium through a Memory Box stencil on a plain, white layer, when that was dry, I mounted it straight on to a plain, white card base.
Next, I spread Sparkle Medium, straight on to a piece of white card and let it dry and then punched out the large snowflake, which I will use on another card and also punched out a smaller one and layered these up on to a piece of red foil cardstock.
I then mounted the focal piece on to the front of the base card with foam tape. Finally, I layered up a sentiment and mounted tat also with foam tape.
Thank you for taking time to visit at this very busy time of year, I truly appreciate it and want to take this opportunity to wish you all a very magical Christmas and great times in the New Year! Thank you all! Hazel xx
Saturday, 28 November 2015
Freshly Made Sketches #214 - Take Two
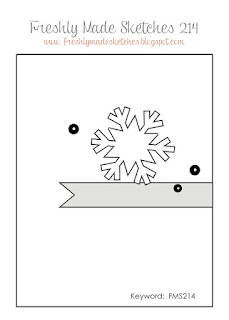
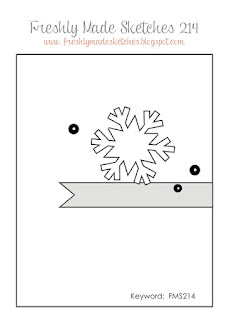
Today I have another card for Freshly Made Sketches #214 - A Sketch by Jen T and in case you didn't see the sketch yesterday, this is it.
I stayed a little truer to the sketch today, but altered the placement of the elements a touch to suit the plan I had in mind for the card.
First, I used a Martha Stewart punch to punch out the snowflake, then I spread, Sparkle Medium over my trusty SSS Falling Snow stencil (I'm getting a lot of use out of those two items this year), then I left it to dry.
Whilst it was drying, I punched the snowflake out again, but this time out of SU Glimmer paper. When it was dry, I adhered a piece of blue foil card behind the aperture and adhered the front panel to a card base.
Next, I stuck the glitter snowflake back in the void and popped the 'outer bits?' (I know that doesn't sound right, but I don't know what you would call them) up with tiny slivers of foam tape for a little dimension and to allow the foil card to peep out.
Finally I finished off with a layered sentiment banner to match the rest of the card. Here it is.
Well, my lovelies, I think that will be me for the weekend now, as I am very behind with my Christmas cards and still need to make a ton . . . where has this year gone, I'd like to know?
I hope you all have a great weekend . . . ours is very wet and very windy - I could say something here, but I won't ;) Hazel xx
I stayed a little truer to the sketch today, but altered the placement of the elements a touch to suit the plan I had in mind for the card.
First, I used a Martha Stewart punch to punch out the snowflake, then I spread, Sparkle Medium over my trusty SSS Falling Snow stencil (I'm getting a lot of use out of those two items this year), then I left it to dry.
Whilst it was drying, I punched the snowflake out again, but this time out of SU Glimmer paper. When it was dry, I adhered a piece of blue foil card behind the aperture and adhered the front panel to a card base.
Next, I stuck the glitter snowflake back in the void and popped the 'outer bits?' (I know that doesn't sound right, but I don't know what you would call them) up with tiny slivers of foam tape for a little dimension and to allow the foil card to peep out.
Finally I finished off with a layered sentiment banner to match the rest of the card. Here it is.
Well, my lovelies, I think that will be me for the weekend now, as I am very behind with my Christmas cards and still need to make a ton . . . where has this year gone, I'd like to know?
I hope you all have a great weekend . . . ours is very wet and very windy - I could say something here, but I won't ;) Hazel xx
Friday, 27 November 2015
Freshly Made Sketches #214 - A Sketch by Jen T
Today's card is for the Freshly Made Sketches #214 challenge, which is a sketch by Jen T. This is her great sketch.
This card was heavily influenced by a video that Tami White did on You Tube and I have gone slightly off the positioning of Jen's terrific sketch and I have used a bauble instead of a snowflake, but I think (hope) it's close enough. Here is my card.
First, I cut the SU bauble out of white, gold foil and black glitter card-stock, then, I used the SU framelits to cut the Santa sleigh from the white card-stock, the houses out of the black glitter card-stock and then the Christmas sentiment out of gold foil card-stock with a Clearly Besotted die.
Next, I layered up the bauble pieces, attached some gold thread and used SSS 'Falling Snow' stencil to add some glitter via some Gold Sparkle Gel - love that stuff - on to a slightly smaller panel.
When all was dry, I adhered the bauble with some foam tape and the panel on to the base card, also with foam tape.
I just love all that sparkle and shine! Thank you for your visit today and for any comments you leave, I really appreciate it! Have a lovely day! Hazel xx
Subscribe to:
Posts (Atom)