Hi fellow crafters! I hope the start to the weekend finds you all well and happy.
Today, I have a card that I made up with a panel that I stamped at my Wednesday evening crafting group, with my new found friends.
The first week that I went, Linda was kind enough to pick me up and take me there. This week, when she offered again, I said I would be brave and make my own way there, I don't like taking advantage of other people's kindness - I say brave, because I have a blindness where directions are concerned - I'm the person, who, doesn't lose her car in a car park, she . . . loses the car park itself (yes my friends, I have done that!)
Anyway, despite the very helpful (and may I say, patient lady on Google Maps), I got hopelessly lost! Three times, I think, but I lost count! Despite my stupidity, the Google Maps lady - I am now on first name terms with her, she tells me she's called Gloria - kept calmly re-calculating my route and got me there in the end!
The evening was a giggle, the ladies warm and welcoming again and Moya (the hostess) was as gracious and lovely as the first time. Despite my shyness with groups of new people, I am gradually coming out of my shell and hopefully, my shyness won't be interpreted as 'standoffishness', but I don't think so because they are all so lovely and very sweet!
Anywho, I wasn't overjoyed by my stamped panel, because, I'm not good at flower arranging (real or virtual), but I think I redeemed it a bit by 'gussying' it up with some foil accents. See what you think. If anyone has any tips on flower arrangements, I'd be so happy if you shared them in the comments.
Here are the pictures.
For those of you who like to know the process. Here goes.
First, I took a plain white panel - I usually cut some in advance, usually the same size as a standard card, that way, I can either have them full on a card base or cut them down to the size I want.
Next, I used my stamp positioner and stamped the sentiment, as I wanted the flowers around the sentiment. Then I stamped the flowers and leaves. I brought the panel home and today, I cut two strips off the sides and cut around the flowers on the left hand side as I wanted some to hang over the edge.
Then, I adhered two strips of black and white patterned paper down the sides and mounted the front panel to the card base with craft foam.
I 'gussied' it up with some WOS, some gold foil (using my Quickie glue pen) and some matching sequins. That's it my friends. Have a truly lovely weekend.
Thank you so much for your visit today and especially if you have left a comment. You are all appreciated more than you know!
Hello my lovely friends! I do hope this finds you well and having a great week! Today, I have a card for one of my favourite challenges that I have woefully neglected for quite some time . . . you all know what life can be, don't you . . . it just gets in the way sometimes!
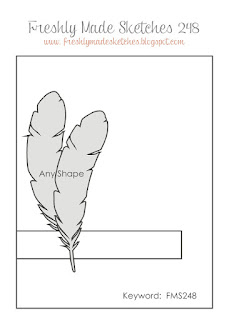
Anywho, when I saw this sketch over on the Freshly Made Sketches challenge blog . . .
. . . everything just fell into place. I already had the front panel with the score lines, to represent the horizontal of the strip in the sketch and the 'faux metal' leaves from a video I had followed on You Tube - I've just looked for it, to link it, and do you know, I can't find it anywhere? I will tell you how it was done after the pictures, as usual. Here you go.
First I made a plain white card base and adhered the panel with the hand-scored lines and mounted it to the front of the card base with a piece of craft foam - that was a mistake, I will explain later - then, I mounted the leaves, the first one flat to the card and the second with clear foam tape.
Next, I stamped the sentiment in Versamark and heat embossed it with copper embossing powder . . . yep! that's right, you saw it back there didn't you? That was my mistake, I should have done that before I mounted it on to the card!! Well hindsight is always 20/20 isn't it? The panel - predictably - warped! I cussed a little, I don't mind admitting, at my own stupidity and shoved it under a heavy book.
When I came back to it, it was much improved, and I finished it off with a few of my dew drops. I don't think it is too noticeable now - thankfully - and, hopefully, I'll remember to think it through completely before I start, but I was excited to see the end result.
Now, back to the faux metal leaves. I took some white, layering card-stock and crumpled it up into a ball. Then I flattened it out again with my hands, so the wrinkles stayed in it.
Then, I covered them with Versamark and sprinkled some copper and some gold EP's in patches and heat set. Then I repeated the process for a second layer - you can do this as many times as you want, the more the layers, the smoother the finish - and that was done.
Thank you so much for your visit today and especially if you have left a comment. You are all appreciated more than you know!
Hi all you lovely people. August is here, all too quickly again, so it's time for another challenge over at Happy Little Stampers CAS and this time the challenge is to Mask A Scene . . . no groaning in the back there, I heard you, I also felt like groaning until I tried it! Turns out it is easier than you think and it's a whole heap of fun too! Added to that the kudos of everyone who doesn't know how easy it is thinking that you are a genius!! If you pop on over there, you will see my fellow team members samples and some very helpful videos to help you with this.
Also, don't forget there are added incentives with prizes from HLS who are sponsoring this challenge.
Without further ado, here is the card and I will post instructions and supplies below.
First I took a plain, white card base - I forgot to say, this is actually a OLC - and I masked of a strip with masking tape (low tack, also placed on my arm a few times to remove even more of the stickiness). Next, I punched a circle out of masking paper and adhered it where I wanted my sun to be.
Then I took Distress Ink in Scattered Straw and a jumbo dauber (I find those easier to use than the blending tools, but that is just me) and sponged very lightly around the circle mask, for the sun.
Next, I took some Distress Ink in Tumbled Glass and lightly sponged an area above and below the sun. The final piece of sponging was the ground area, which I did in DI Gathered Twigs.
The final touch to the scene was to stamp my images. I used Versafine Black Onyx ink for that and stamped some grasses and birds from the Penny Black Natures Friends stamp set with a first generation and second generation stamping and also some grasses from the Stampin' Up Wetlands set.
When I had finished creating my little scene, I carefully removed the masking tape and stamped my sentiment, also from, the Stampin' Up Wetlands set.
There you have it, a very simple, one layer card that will make everyone think you are an artist! You can also, mask off images and stamp over them to build up a scene too! So, come and join in the fun and let us see what you have come up with . . . I can't wait to see them! Have a crafty day! Hazel xx